#1 Head Strong
- During palms & heel turns — in all directions, move eyes first followed by the head.
- Stance when standing. If you do not use the ball for steps 1-5, concentrate on good posture. This is true for any of our standing positions. Learn it now. Better Posture = Better Looks.
- Most of us think we are standing straight when in reality a hip or shoulder is raised, our head is tilted, feet point differently, etc. Try to have a partner evaluate your standing position; at the least, evaluate yourself in a mirror or reflection from window.
#2 Necking
- Reach behind back move — arms and shoulders OFTEN do not have the same flexibility from one side to the next. Do not fret over the discrepancy from side-to-side.
- Work in shower with a towel, wash cloth, loofa stick or other grip extension to stretch this area (especially on the restricted side).
#3 Laughing Windmills
- For shoulder restrictions or discomfort, see the Alerts Page for modifications.
- Outside of PizzazzEE‑25, to address Rotator Cuff Injury (with doctor's permission) use resistance band, tying one end to a door handle. Bring and keep elbow close to body. Pull band across body by rotating the forearm (20x). Turn body 180-degrees so band is in front of stomach. Then rotate forearm out (20x). Switch sides and repeat.
#4 Off to Jail
- If you do not own a gym ball (balance ball), consider using a rolled-towel. While the video states placing your fist between knees for the pelvic squeeze — the rolled-towel should work more easily.
- Pelvic squeeze — practice other times of day (sitting in a meeting, coffee shop, on the telephone or zoom meetings).
- Basic performers should join advanced performers doing the move with intertwined hands up the back.
#5 Stop Signs
- When doing extension over the ball, keep torso parallel to the floor while arms on ball.
- If you have someone that could determine it for you, have them check to see that your shoulders are not raised above hips.
- You might add a squeeze of shoulder blades together as well as allowing stomach to droop.
#6 Time on Your Side
- On rotation to the sides, keep the shoulders in line (one should not be forward more than the other). Additionally keep the bend to both sides to the same degree, without allowing a more flexible side to 'reach' further than the restricted side.
- Pigeon-toed stances bring the pelvis back in line with the shoulders. [Sometimes upper back tightness feels instantly less tight if a person stands pigeon-toed as the load-bearing joints are acting more supportively.] This pigeon-toed stance is often used in therapies using long-duration holds of positions.
#7 Back Balance
- If you start with the basic move, and are not already doing the "advanced arch," start moving toward the advanced arch slowly.
- Increase the arch by pushing hips further forward alone before trying to arch back.
- For back discomfort, see Alerts Page for modifications.
#8 Groin Lunge
- This is not a typical "lunge" – which can disturb knees/hips. The most important part of this groin lunge is to gently stretch the groin.
- This position of a lunge strengthens quadriceps – which is a key to reducing knee pain. (This can be considered when repetitive lunges are not recommended due to knee issues).
#9 Hamstring Ski Rock
- Alert. Follow the directions carefully that instruct certain sections to come up SLOWLY – to avoid dizziness.
- If too much strain on the back, either widen feet placement or bring hands further up legs. This should improve with more workouts. Tight hamstrings are a major source of back pain.
- For back discomfort, see Alerts Page for modifications.
#10 Tens and Toes
- Alert. For any knee pain when placing feet in the "3:00" and "9:00" positions, simply ease the angle to "2:00" or "10:00" or less.
- Other moves and positions for TFL and IT band are found in the "bonus moves" section. (Coming soon). Tensor fascia latta and IT band (close by) are sometimes confused. IT Band Syndrome (iliotial band connecting tibia and pelvis) can cause pain in knee, hip and thigh. See 'bonus moves' page for other exercise outside of workout.
#11 Balancing Teacups
- Start with stabilization (like a chair) to begin with — or at least have it available. A wall can also work.
- "Pulses" directed in step #11 should be thought of as contractions. These are also helpful with digestive processes.
- If you can't reach your ankles or toes for the second phase of Step #11 (the quadriceps stretch), pull on your pant cuff or use a stretch-band around the ankle to hold heel toward the buttock.
#12 Squat & Lift
- Develop your own speed. When starting out, your accomplished number doesn't matter much; later you can perform and count for your own needs. But learn the technique first – THEN do the counting.
- Best to keep feet at least shoulder width apart, as seen on the video.
- Remember this is a great weight-lifting step. Use it to the max, by performing carefully.
#13 Butterfly
- Don't bounce. The butterfly, like many of our moves, has both a stretch (static) and active component. The stretch is best done gently — no bouncing. It targets the inner thigh muscles. Further, it exercises muscles of the chest, shoulder, arms and abs. There are many variations, even those with gym machines, but this simple one can do the trick.
- Alert. If you have knee discomfort, see the Alerts Page for modifications.
- If you have a gym ball for other portions of PizzazzEE‑25, you can use it outside the routine for a variation of this move (even when watching TV) that works abs. [See Bonus Moves section, coming soon, for butterfly variations.]
#14 Victory Roll
- Alert. ALWAYS look behind you for anything in your way before rocking backward.
- Check your flooring before doing this. You may want some amount of padding for your back, such as soft carpeting or a yoga pad.
- Balance can be difficult at any level of #14 (the victory roll). At all levels, the sit-back, the leg lift and the full 'V roll' you should concentrate on using core trunk muscles to keep you in place.
- Don't be surprised if some days you do this easily and other times you can't keep your balance. It will come.
- Alert. If you have back discomfort, see the Alerts Page for modifications.
#15 Yoga Pretzel
- If you leave the leg straight on the first side, do the same on the other. Balanced effort for both sides is most important.
- Alert. If you have knee discomfort, see the Alerts Page for modifications.
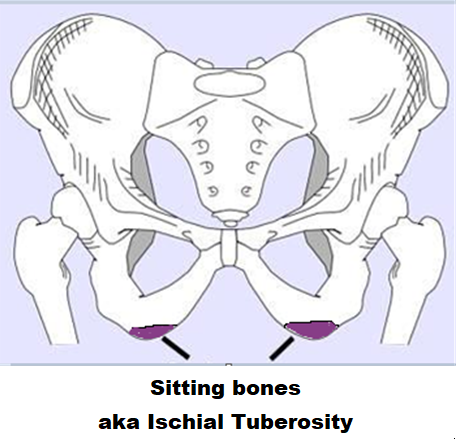
- The Sitting bone (aka sitz bone, sits bone or ischial tuberosity) is a bony protrusion at the base of your pelvic bones. Make sure you can locate this (at bottom of each side of buttocks) to best understand how you should position yourself for best stretch.
[video home]
#16 Hugs & Rolls
- ALWAYS look behind you for anything in your way before rocking backward.
- This exercise is helpful for muscles around the knee. When doing on the first side, let the word "now" start your count; when starting on the next, the word "begin" is your cue. This isn't necessary, but helps when you do the program regularly.
- Vertical bike pedal can be done in a variety of ways; the video demonstrates only one. To start, do what is most comfortable.
- Alert. If you have knee or back discomfort, see the Alerts Page for modifications.
#17 Twizzlers
- PizzazzEE‑25 instructions for this exercise directs the lifting of "top knee up 1st" when returning from the side positions.
- This is done to lessen strain on the back without losing working-benefit.
#18 Paint the Floor
- You will learn a portion of this step called "squeezing out the brushes". If done in bed, either AM, PM, or both it is very helpful for hip and pelvic muscles.
- At those times, when doing this move outside the PizzazzEE‑25 workout, hold each position longer.
- Alert. If you have back discomfort, see the Alerts Page for modifications.
#19 Oblique Lift
- Start out in a basic position (foot on floor) to make certain that it doesn't overly stress your stomach muscles.
- To judge equal time on each side, start your lift using the word "Now" to start the first time (on right side) and "start" for the next (left side).
#20 PQL Sweep
- In the beginning of #20, the directions say sweep "heel to toes," despite what the video may look like, you want to concentrate on that moving heel (not toes). Keep it as close to leg as possible.
- Some people have sensitive hip bones and may need extra paddling under hip. A garden pad, exercise foam or rolled towel may work.
- Side planks have MANY variations (PizzazzEE‑25 uses two, both of which are somewhat gentle). In some varieties a full plank can be done with just one arm, and even lifting one leg. This is more difficult. But a lesser variety of our variant is to even allow the lower leg on the floor. WHATEVER you choose to do – start out gently and take advancement SLOWLY.
- Why is this called PQL sweep? #20 and #23 (the same) work sometimes difficult muscles to reach — the psoas and the quadratus lumborum.
- For shoulder restrictions or discomfort, see the Alerts Page for modifications.
#21 21-Down
- Be sure to tighten core muscles (around the stomach) when lifting legs; again this puts less strain on the lower back.
- Alert. If you have back discomfort, see the Alerts Page for modifications.
- A bandana, other cloth or thin cushion on the floor or rug may be more comfortable for your face.
#22 Angry Cat & Bird Dog
- If there is real discomfort on "all 4s" — use extra padding to kneel on (such as a garden pad, suggested for hips on #20 & 23).
- Angry Cat – Strong stomach contractions improve core strength and are also helpful for better elimination. Concentrate on increasing the time for this if improved elimination is of interest to you.
- For wrist restrictions or discomfort, see the Alerts Page.
#23 PQL Sweep
- In the beginning of #23, the directions say sweep "heel to toes," despite what the video may look like, you want to concentrate on that moving heel (not toes). Keep it as close to leg as possible.
- Some people have sensitive hip bones and may need extra paddling under hip. A garden pad, exercise foam or rolled towel may work.
- Side planks have MANY variations (PizzazzEE‑25 uses two, both of which are somewhat gentle). In some varieties a full plank can be done with just one arm, and even lifting one leg. This is more difficult. But a lesser variety of our variant is to even allow the lower leg on the floor. WHATEVER you choose to do – start out gently and take advancement SLOWLY.
- Why is this called PQL sweep? #20 and #23 (the same) work sometimes difficult muscles to reach — the psoas and the quadratus lumborum.
- For shoulder restrictions or discomfort, see the Alerts Page for modifications.
#24 Push & Plank
- Plank actions (side or others like this one) strengthen core muscles to help prevent most Low Back Pain. Start with Basic and add one or two advanced planks when feeling strong, but don't rush this.
- Don't just 'look' like you are doing a motion. [This is true for many of our moves.] For instance, when doing the shoulder stretch with finger pulls along the floor – make certain you can feel the stretch in the shoulder.
- For knee restrictions or back discomfort, see Alerts Page for modifications.
- For those wanting to pursue additional stamina and strengthening, see the More Stamina Page – #24 Push & Plank.
#25 Twisted Child
- Notice that instructions offer a "hips wide" child's position (I suggest it). The video shows the same. Some people prefer this simply because their hip bones (and where they fit into pelvis) feel better. You may find legs together more comfortable, others may not. While the different variations stretch slightly different back and hip muscles, all of these muscles are used during PizzazzEE‑25 – so do what is comfortable. People with 'rounder' bellies often prefer the hips wide pose.
- If you feel like you are uncomfortable leaning too far forward in a child's position, instead of putting arms alongside for beginning pose, fold them under your forehead.
- For knee restrictions or discomfort, see Alerts Page for modifications.
- When finished with PizazzEE‐25 – give yourself a BIG thumbs-up. You deserve it!